
备注
-
不建议开启
root密码登录;如无特殊需求,保持PermitRootLogin no或prohibit-password。 -
如果只是给Trae/VS Code/远程工具连WSL,用普通用户+公钥更安全。
-
如果
systemctl不可用,需要先在/etc/wsl.conf中启用systemd,然后在Windows中执行wsl --shutdown后重启WSL。 -
WSL2下不要在Ubuntu内安装NVIDIA Linux显卡驱动,驱动由Windows侧提供;WSL内只安装CUDA Toolkit。 -
这里选择安装
CUDA Toolkit 13.1,与当前驱动支持版本匹配;实际使用PyTorch/vLLM时,还要以对应框架支持的CUDA wheel为准。
卸载乌班图24.04
本文的教程从重装开始,若为第一次安装可跳过开头。
分步
查看已安装的 WSL 发行版
# 在 PowerShell 或 Windows 终端中运行
wsl --list --verbose
# 或简写
wsl -l -v
停止 Ubuntu 24.04
wsl --terminate Ubuntu-24.04
# 或使用分发名称
wsl -t Ubuntu-24.04
注销(删除)Ubuntu 24.04
wsl --unregister Ubuntu-24.04注意: 这个命令会永久删除Ubuntu及其所有数据,不可恢复!
完整流程
wsl --install -d Ubuntu-24.04重新安装
分步
以管理员身份打开PowerShell
# 直接安装最新版本
wsl --install -d Ubuntu-24.04
完整流程
PS C:\Users\Skyler> wsl --install -d Ubuntu-24.04
正在下载: Ubuntu 24.04 LTS
正在安装: Ubuntu 24.04 LTS
已成功安装分发。可以通过 “wsl.exe -d Ubuntu-24.04” 启动它
正在启动 Ubuntu-24.04...
Provisioning the new WSL instance Ubuntu-24.04
This might take a while...
Create a default Unix user account: skyler
New password:
Retype new password:
passwd: password updated successfully
To run a command as administrator (user "root"), use "sudo <command>".
See "man sudo_root" for details.

skyler@DESKTOP-L2L5NTC:/mnt/c/Users/Skyler$
可选
设置Ubuntu-24.04为默认发行版
# 使用分发名称
wsl --setdefault Ubuntu-24.04
# 或简写
wsl -s Ubuntu-24.04
网络设置
打开WSL Setting
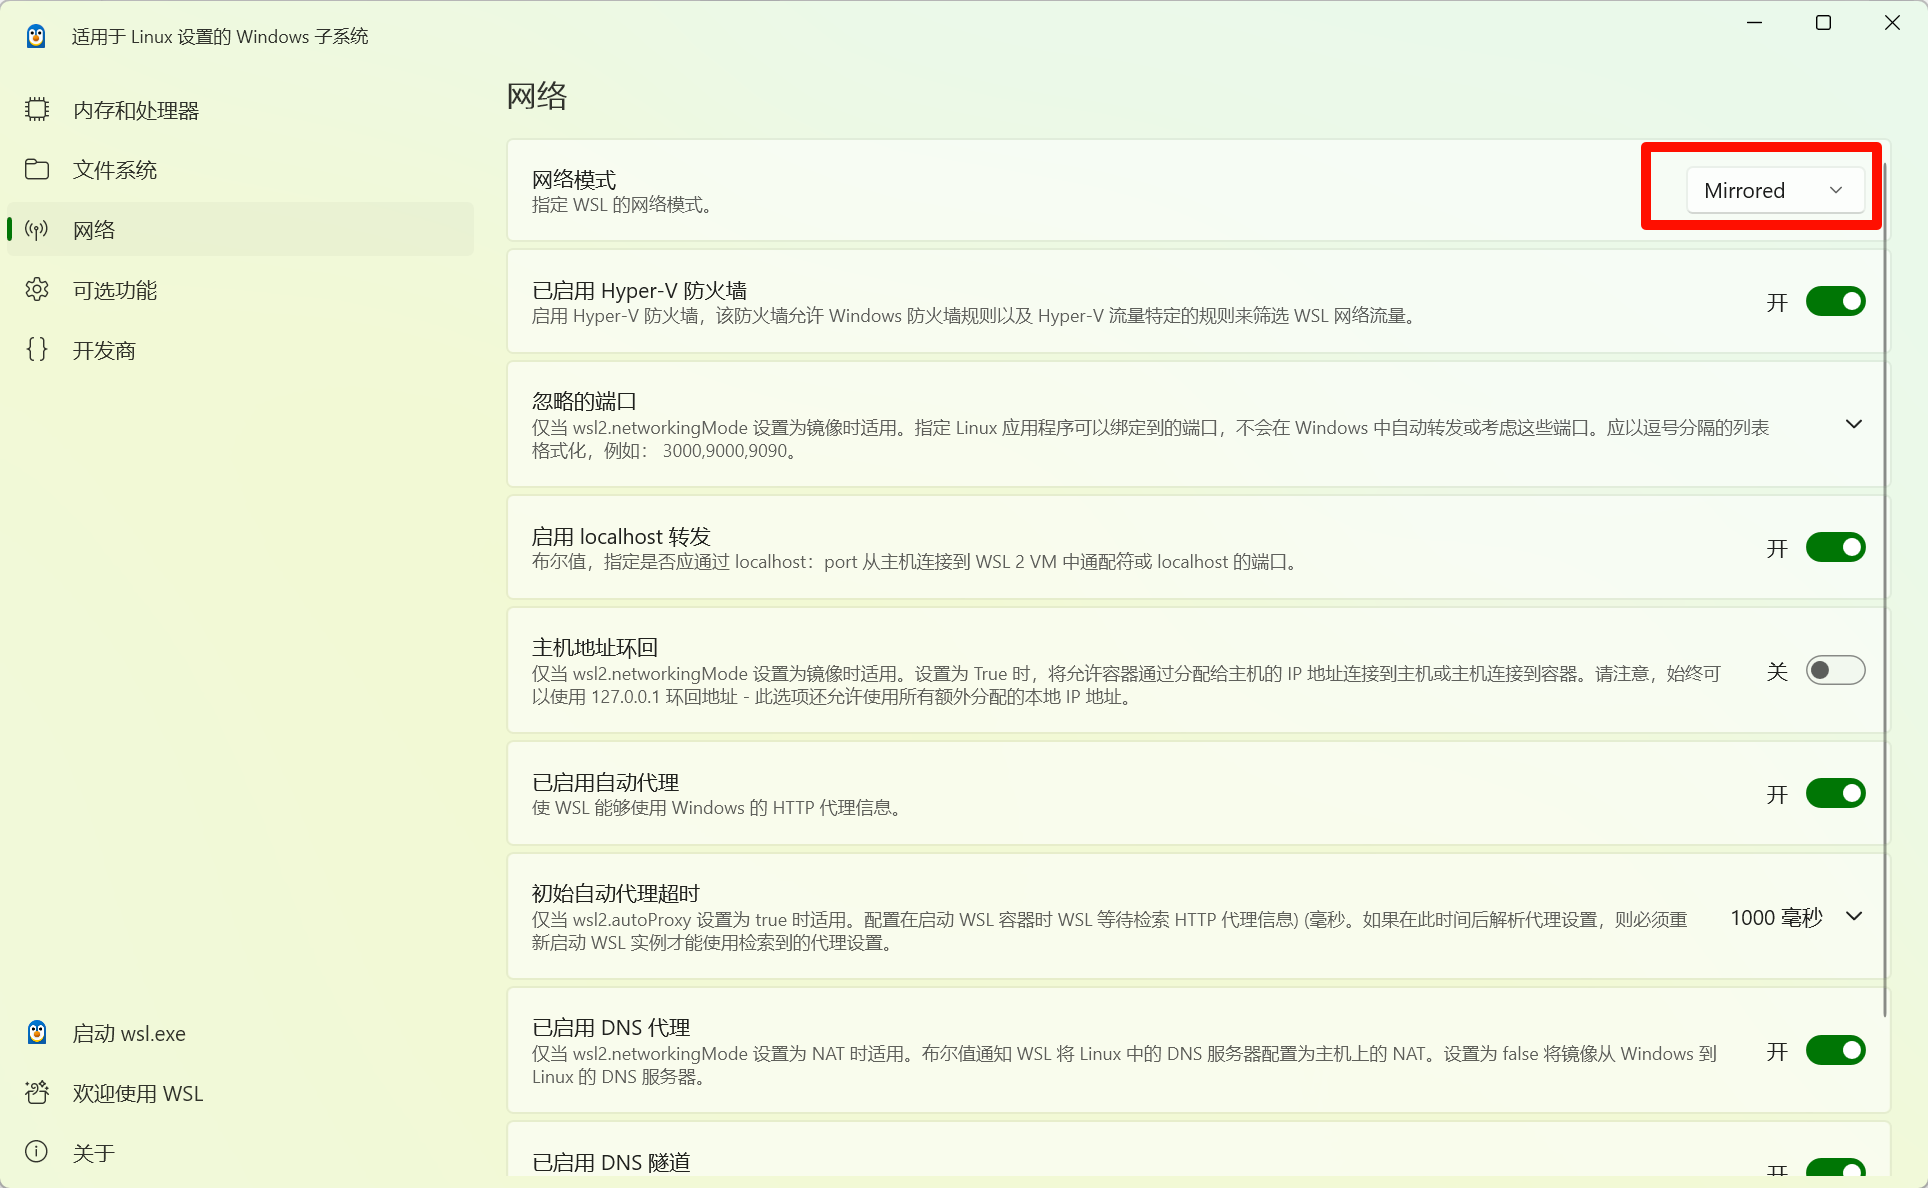
NAT 模式下 WSL 的虚拟网络地址可能变化;Mirrored 模式会镜像 Windows 网络接口,通常更方便使用 localhost、代理、VPN 和局域网访问。
代理设置
NAT模式下需要将代理软件的允许局域网连接打开,Mirrored则可忽略这一步
编辑~/.bashrc
nano ~/.bashrc在最后一行添加
# 设置代理环境变量(端口按实际修改)
export http_proxy=http://localhost:63107
export https_proxy=http://localhost:63107
export all_proxy=socks5://localhost:63107
如果是NAT模式则添加
# 获取 Windows 主机 IP
host_ip=$(ip route | awk '/default/ {print $3}')
# 设置代理环境变量(端口按实际修改)
export http_proxy=http://$host_ip:63107
export https_proxy=http://$host_ip:63107
export all_proxy=socks5://$host_ip:63107
生效配置
source ~/.bashrc验证配置
curl -I www.google.comskyler@DESKTOP-L2L5NTC:/mnt/c/Users/Skyler$ curl -I www.google.com
HTTP/1.1 200 OK
Transfer-Encoding: chunked
Cache-Control: private
Connection: keep-alive
Content-Security-Policy-Report-Only: object-src 'none';base-uri 'self';script-src 'nonce-C9-WCfdHe3GHPoGj3dvQqQ' 'strict-dynamic' 'report-sample' 'unsafe-eval' 'unsafe-inline' https: http:;report-uri https://csp.withgoogle.com/csp/gws/other-hp
Content-Type: text/html; charset=ISO-8859-1
Date: Thu, 18 Dec 2025 05:21:14 GMT
Expires: Thu, 18 Dec 2025 05:21:14 GMT
Keep-Alive: timeout=4
P3p: CP="This is not a P3P policy! See g.co/p3phelp for more info."
Proxy-Connection: keep-alive
Server: gws
Set-Cookie: AEC=AaJma5tMq-RxNzziWYeGHtL7uA6sjTI4o0TDrzCpRm-NOJhupDaWPUjS6A; expires=Tue, 16-Jun-2026 05:21:14 GMT; path=/; domain=.google.com; Secure; HttpOnly; SameSite=lax
Set-Cookie: NID=527=Sp-T9PiHMQ5OyeIVr_NY2QkIaJo0awPOAMHbRJOdUj8Qge_zGi0k6uNXJtZiaDVfBzF9xbTscIo3fNBkr-qWt9Y2qd-X25AwyjCMTPnxQaREp4zf3hgjmZDFuyL_JH2u5Sk7rGuVV5wIK28TZOuhdB5xUyZ-2BoL56ea_sory5KQ-Mgfa97Y-nVJZaDbMcIYDgUDcfGHuZmxGIY8RiV_ok8-dGS289RA5Kw; expires=Fri, 19-Jun-2026 05:21:14 GMT; path=/; domain=.google.com; HttpOnly
X-Frame-Options: SAMEORIGIN
X-Xss-Protection: 0开启SSH
更新软件包并安装 OpenSSH 服务器
sudo apt update
sudo apt install openssh-server -y
启动 SSH 服务并设置开机自启
sudo service ssh start
sudo systemctl enable ssh
修改端口
sudo nano /etc/ssh/sshd_config找到并修改以下行
# 修改端口
Port 5643

# 确保允许密码认证(如果不需要可禁用)
PasswordAuthentication yes

# 允许 root 登录(根据需要设置)
PermitRootLogin yes

# 允许公钥认证
PubkeyAuthentication yes

# 允许空密码(通常设为 no)
PermitEmptyPasswords no
重启 SSH 服务
sudo systemctl restart ssh检查 SSH 是否监听新端口
sudo ss -tlnp | grep sshroot@DESKTOP-L2L5NTC:~# sudo ss -tlnp | grep ssh
LISTEN 0 128 0.0.0.0:5643 0.0.0.0:* users:(("sshd",pid=2701,fd=3))
LISTEN 0 128 [::]:5643 [::]:* users:(("sshd",pid=2701,fd=4))安装Cuda
检查英伟达驱动
nvidia-smiskyler@DESKTOP-L2L5NTC:/mnt/c/Users/Skyler$ nvidia-smi
Thu Dec 18 13:33:12 2025
+-----------------------------------------------------------------------------------------+
| NVIDIA-SMI 590.44.01 Driver Version: 591.44 CUDA Version: 13.1 |
+-----------------------------------------+------------------------+----------------------+
| GPU Name Persistence-M | Bus-Id Disp.A | Volatile Uncorr. ECC |
| Fan Temp Perf Pwr:Usage/Cap | Memory-Usage | GPU-Util Compute M. |
| | | MIG M. |
|=========================================+========================+======================|
| 0 NVIDIA GeForce RTX 5090 ... On | 00000000:02:00.0 Off | N/A |
| N/A 39C P4 19W / 40W | 0MiB / 24463MiB | 0% Default |
| | | N/A |
+-----------------------------------------+------------------------+----------------------+
+-----------------------------------------------------------------------------------------+
| Processes: |
| GPU GI CI PID Type Process name GPU Memory |
| ID ID Usage |
|=========================================================================================|
| No running processes found |
+-----------------------------------------------------------------------------------------+
skyler@DESKTOP-L2L5NTC:/mnt/c/Users/Skyler$安装对应13.1版本的Cuda
选择如图所示
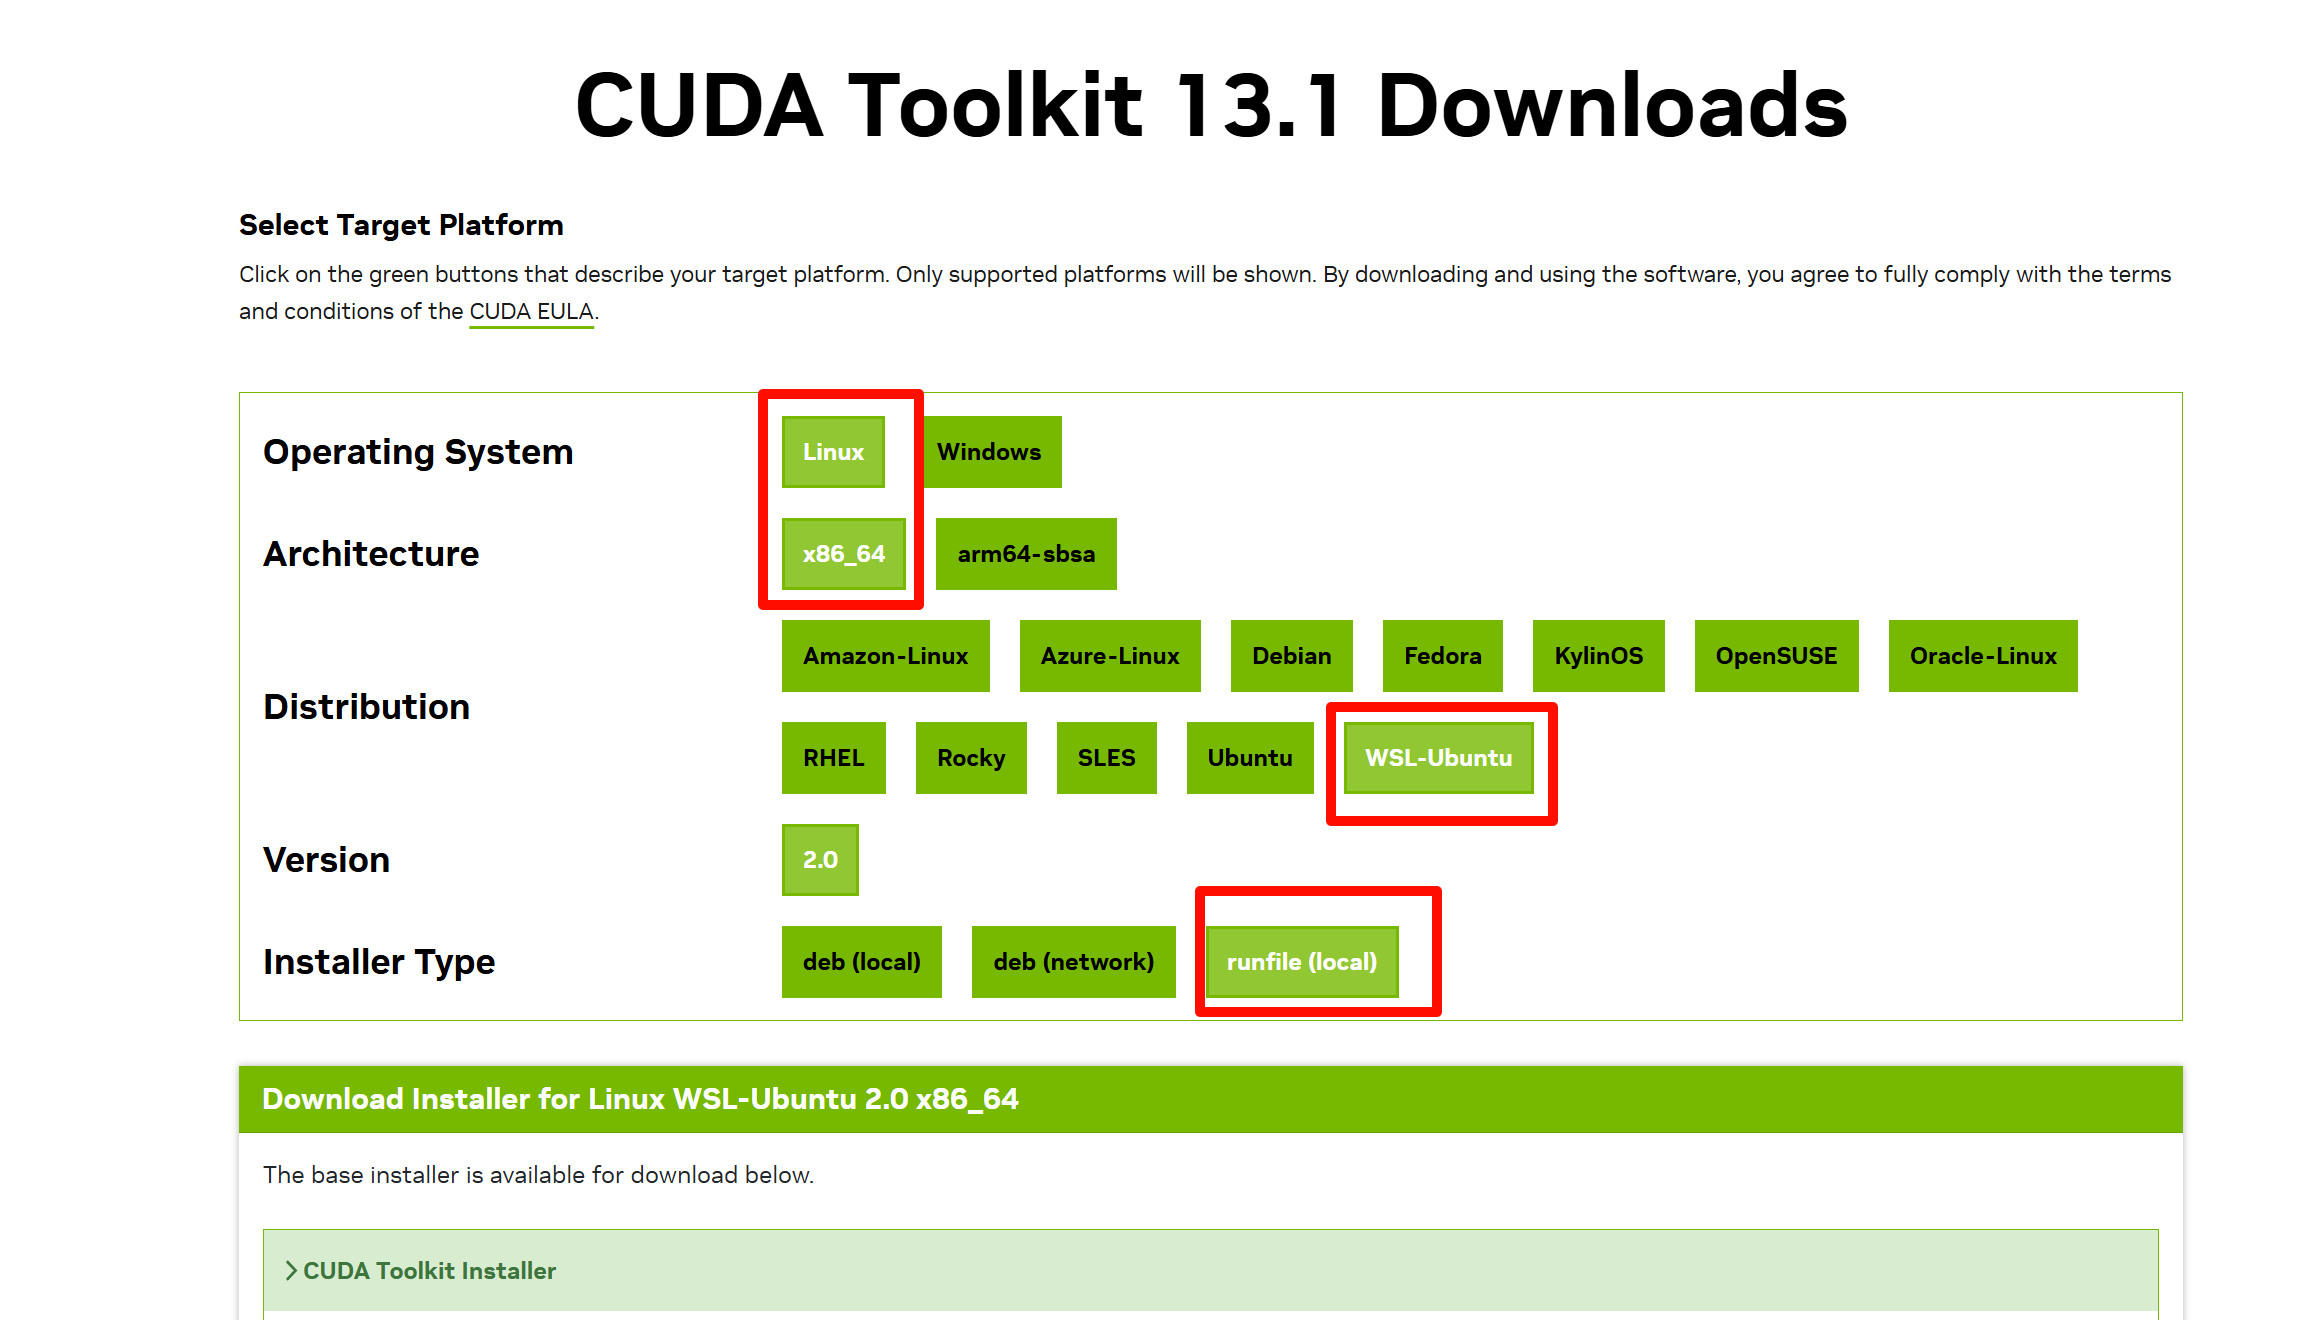
接着在下方能看见安装命令

复制即可
wget https://developer.download.nvidia.com/compute/cuda/13.1.0/local_installers/cuda_13.1.0_590.44.01_linux.run
sudo sh cuda_13.1.0_590.44.01_linux.run
逐条复制
skyler@DESKTOP-L2L5NTC:~$ wget https://developer.download.nvidia.com/compute/cuda/13.1.0/local_installers/cuda_13.1.0_590.44.01_linux.run
--2025-12-18 13:37:57--  https://developer.download.nvidia.com/compute/cuda/13.1.0/local_installers/cuda_13.1.0_590.44.01_linux.run
Resolving localhost (localhost)... 127.0.0.1
Connecting to localhost (localhost)|127.0.0.1|:63107... connected.
Proxy request sent, awaiting response... 200 OK
Length: 4345889047 (4.0G) [application/octet-stream]
Saving to: ‘cuda_13.1.0_590.44.01_linux.run’

cuda_13.1.0_590.44.01_linux.r 100%[=================================================>]   4.05G  67.2MB/s    in 67s

2025-12-18 13:39:10 (61.9 MB/s) - ‘cuda_13.1.0_590.44.01_linux.run’ saved [4345889047/4345889047]在运行sh cuda_13.1.0_590.44.01_linux.run 之前要安装编译使用的gcc
sudo apt-get install build-essential -y运行安装脚本
sudo apt-get install build-essential -y输入accept并回车
┌──────────────────────────────────────────────────────────────────────────────┐
│  End User License Agreement                                                  │
│  --------------------------                                                  │
│                                                                              │
│  NVIDIA Software License Agreement and CUDA Supplement to                    │
│  Software License Agreement.                                                 │
│                                                                              │
│  The CUDA Toolkit End User License Agreement applies to the                  │
│  NVIDIA CUDA Toolkit, the NVIDIA CUDA Samples, the NVIDIA                    │
│  Display Driver, NVIDIA Nsight tools (Visual Studio Edition),                │
│  and the associated documentation on CUDA APIs, programming                  │
│  model and development tools. If you do not agree with the                   │
│  terms and conditions of the license agreement, then do not                  │
│  download or use the software.                                               │
│                                                                              │
│  Last updated: January 12, 2025                                              │
│                                                                              │
│                                                                              │
│  Preface                                                                     │
│  -------                                                                     │
│                                                                              │
│──────────────────────────────────────────────────────────────────────────────│
│ Do you accept the above EULA? (accept/decline/quit):                         │
│ accept                                                                       │
└──────────────────────────────────────────────────────────────────────────────┘
默认勾选即可,选择Install
──────────────────────────────────────────────────────────────────────────────┐
│ CUDA Installer                                                               │
│ + [X] CUDA Toolkit 13.1                                                      │
│   [ ] CUDA Documentation 13.1                                                │
│ - [ ] Kernel Objects                                                         │
│      [ ] nvidia-fs                                                           │
│   Options                                                                    │
│   Install                                                                    │
│                                                                              │
│                                                                              │
│                                                                              │
│                                                                              │
│                                                                              │
│                                                                              │
│                                                                              │
│                                                                              │
│                                                                              │
│                                                                              │
│                                                                              │
│                                                                              │
│                                                                              │
│                                                                              │
│                                                                              │
│ Up/Down: Move | Left/Right: Expand | 'Enter': Select | 'A': Advanced options │
└──────────────────────────────────────────────────────────────────────────────┘
安装后提示
skyler@DESKTOP-L2L5NTC:~$ sudo sh cuda_13.1.0_590.44.01_linux.run
===========
= Summary =
===========

Driver:   Not Selected
Toolkit:  Installed in /usr/local/cuda-13.1/

Please make sure that
 -   PATH includes /usr/local/cuda-13.1/bin
 -   LD_LIBRARY_PATH includes /usr/local/cuda-13.1/lib64, or, add /usr/local/cuda-13.1/lib64 to /etc/ld.so.conf and run ldconfig as root

To uninstall the CUDA Toolkit, run cuda-uninstaller in /usr/local/cuda-13.1/bin
***WARNING: Incomplete installation! This installation did not install the CUDA Driver. A driver of version at least 590.00 is required for CUDA 13.1 functionality to work.
To install the driver using this installer, run the following command, replacing <CudaInstaller> with the name of this run file:
    sudo <CudaInstaller>.run --silent --driver

Logfile is /var/log/cuda-installer.log
使用脚本配置环境
sudo tee /etc/profile.d/cuda.sh << 'EOF'
#!/bin/bash

# CUDA 环境变量配置
# 自动检测并设置 CUDA 路径

# 检查 CUDA 13.1 是否存在
if [ -d "/usr/local/cuda-13.1" ]; then
    export CUDA_HOME=/usr/local/cuda-13.1
    export PATH=$PATH:$CUDA_HOME/bin
    export LD_LIBRARY_PATH=$LD_LIBRARY_PATH:$CUDA_HOME/lib64
    export LD_LIBRARY_PATH=$LD_LIBRARY_PATH:$CUDA_HOME/extras/CUPTI/lib64
    echo "已设置 CUDA 13.1 环境变量"

# 检查 CUDA 11.4 是否存在
elif [ -d "/usr/local/cuda-11.4" ]; then
    export CUDA_HOME=/usr/local/cuda-11.4
    export PATH=$PATH:$CUDA_HOME/bin
    export LD_LIBRARY_PATH=$LD_LIBRARY_PATH:$CUDA_HOME/lib64
    export LD_LIBRARY_PATH=$LD_LIBRARY_PATH:$CUDA_HOME/extras/CUPTI/lib64
    echo "已设置 CUDA 11.4 环境变量"

# 检查默认 CUDA 链接是否存在
elif [ -L "/usr/local/cuda" ]; then
    export CUDA_HOME=/usr/local/cuda
    export PATH=$PATH:$CUDA_HOME/bin
    export LD_LIBRARY_PATH=$LD_LIBRARY_PATH:$CUDA_HOME/lib64
    export LD_LIBRARY_PATH=$LD_LIBRARY_PATH:$CUDA_HOME/extras/CUPTI/lib64
    CUDA_VERSION=$(basename $(readlink -f /usr/local/cuda))
    echo "已设置 $CUDA_VERSION 环境变量"
fi
EOF
设置权限
sudo chmod +x /etc/profile.d/cuda.sh重新加载配置
source /etc/profile验证
nvcc --versionskyler@DESKTOP-L2L5NTC:~$ nvcc --version
nvcc: NVIDIA (R) Cuda compiler driver
Copyright (c) 2005-2025 NVIDIA Corporation
Built on Fri_Nov__7_07:23:37_PM_PST_2025
Cuda compilation tools, release 13.1, V13.1.80
Build cuda_13.1.r13.1/compiler.36836380_0安装cuDNN
打开官网链接
选择如图
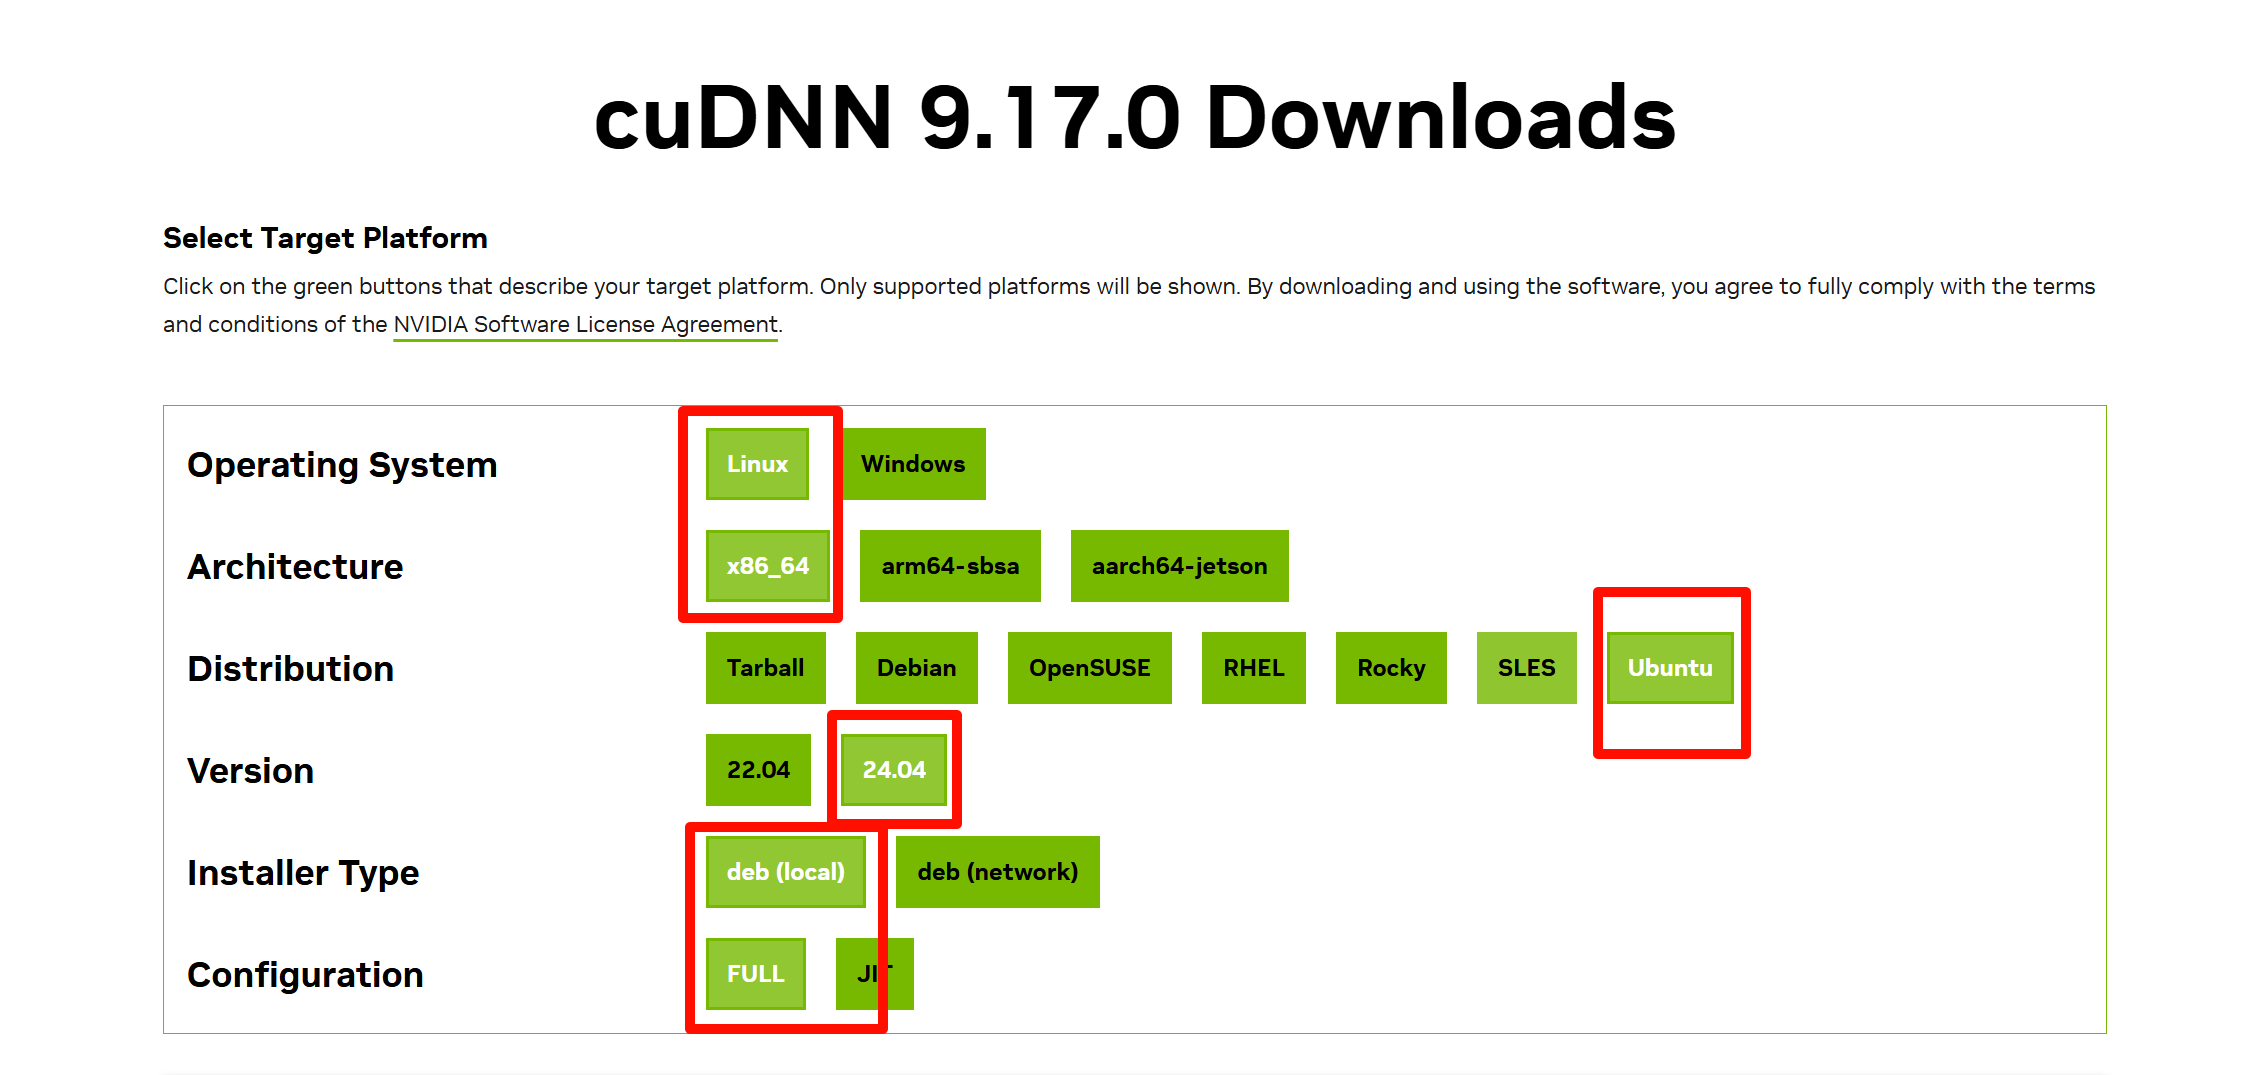
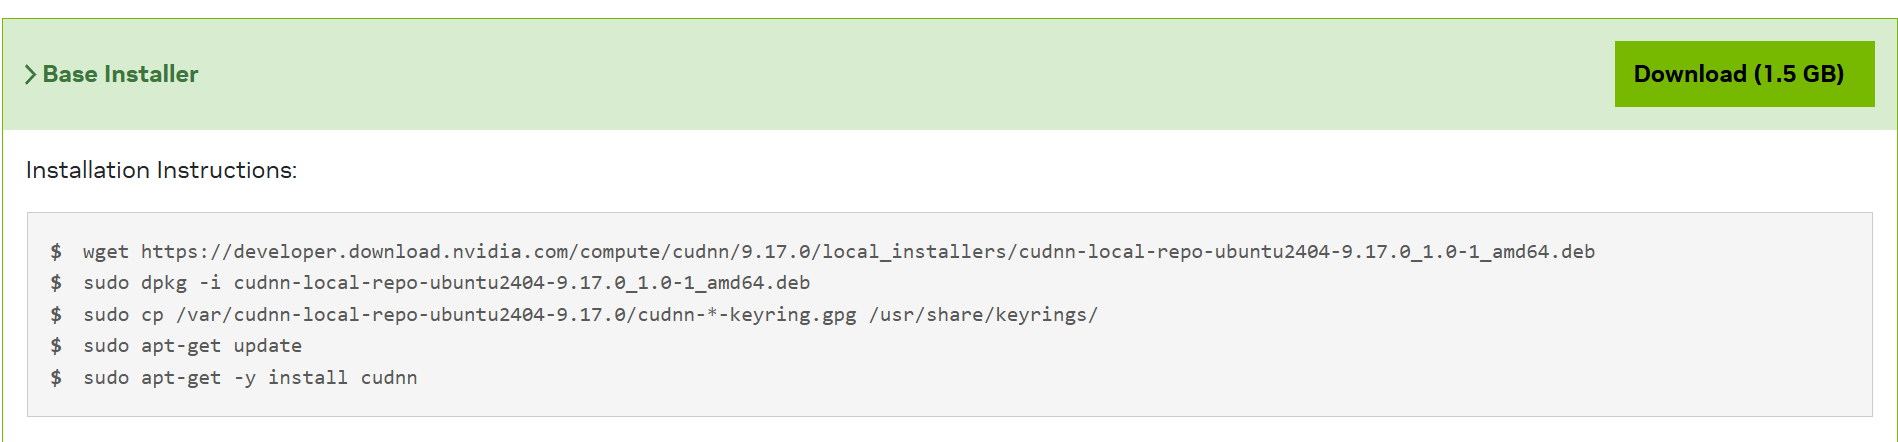
逐行输入命令即可
wget https://developer.download.nvidia.com/compute/cudnn/9.17.0/local_installers/cudnn-local-repo-ubuntu2404-9.17.0_1.0-1_amd64.deb
sudo dpkg -i cudnn-local-repo-ubuntu2404-9.17.0_1.0-1_amd64.deb
sudo cp /var/cudnn-local-repo-ubuntu2404-9.17.0/cudnn-*-keyring.gpg /usr/share/keyrings/
sudo apt-get update
sudo apt-get -y install cudnn
安装Miniconda
打开官网
下载如图
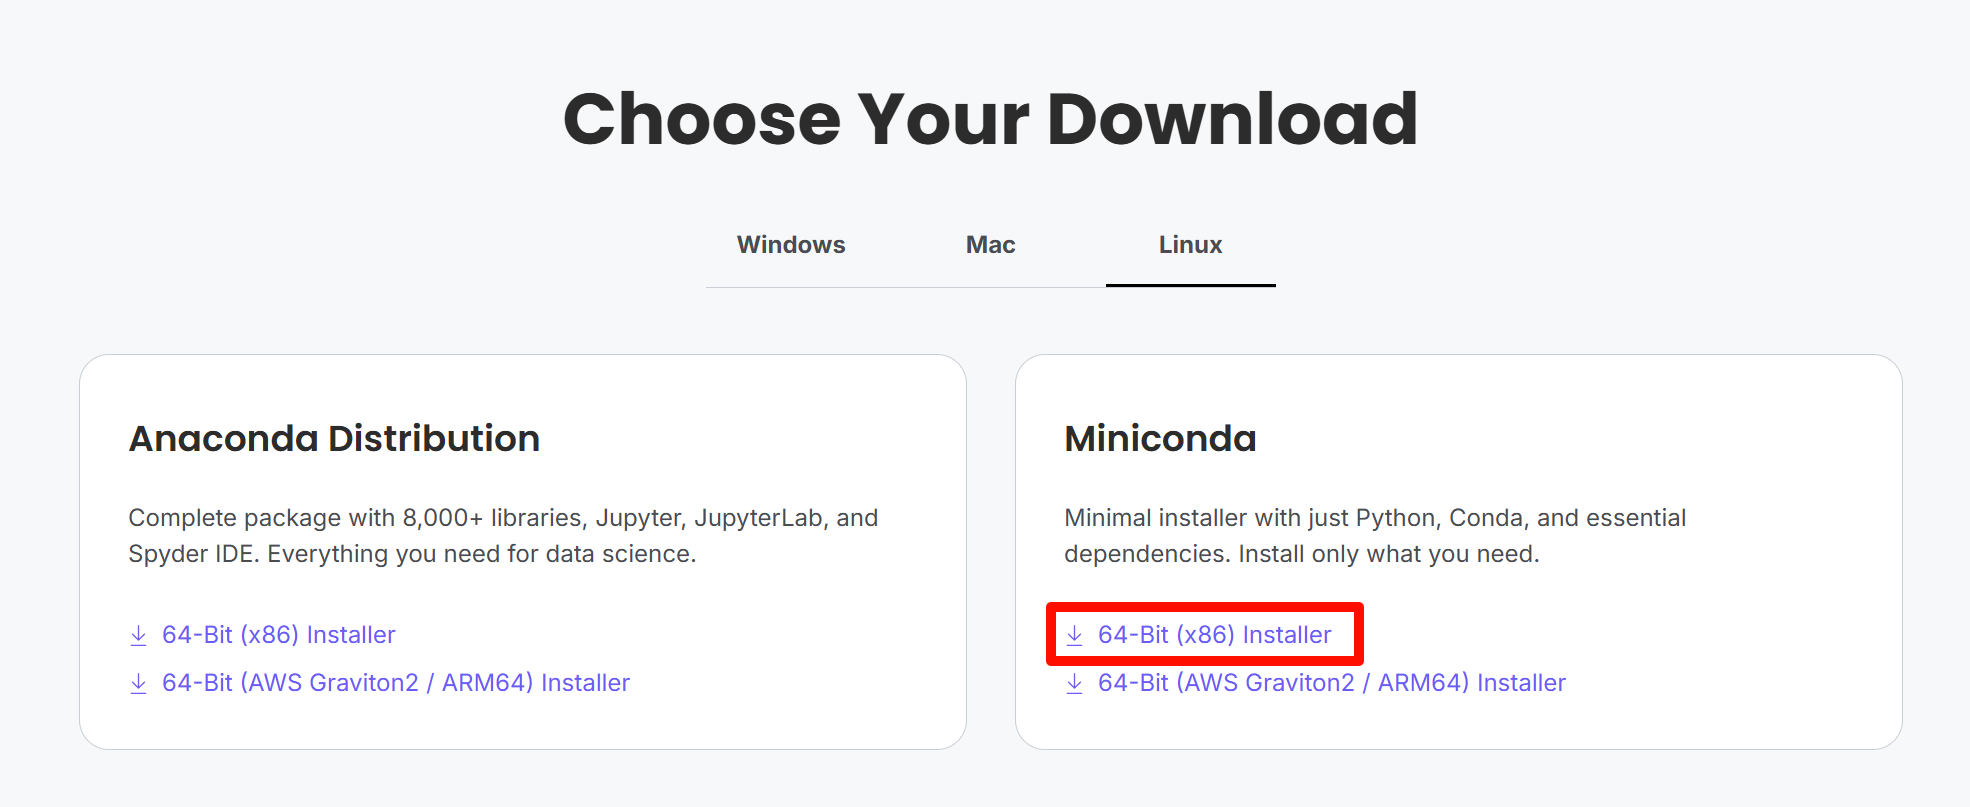
下载完后复制到WSL,后运行脚本(xxx为文件全名)
bash xxx.shDocker 使用 Cuda
如果需要在 WSL2 的 Docker 容器中使用 NVIDIA GPU,除了 Windows 侧已经安装好 NVIDIA 驱动、WSL 内能正常执行 nvidia-smi 之外,还需要在 WSL Ubuntu 中安装 NVIDIA Container Toolkit。
先添加 NVIDIA 官方源
curl -fsSL https://nvidia.github.io/libnvidia-container/gpgkey \

  | sudo gpg --dearmor -o /usr/share/keyrings/nvidia-container-toolkit-keyring.gpg

curl -s -L https://nvidia.github.io/libnvidia-container/stable/deb/nvidia-container-toolkit.list \

  | sed 's#deb https://#deb [signed-by=/usr/share/keyrings/nvidia-container-toolkit-keyring.gpg] https://#g' \

  | sudo tee /etc/apt/sources.list.d/nvidia-container-toolkit.list
更新并安装:
sudo apt update

sudo apt install -y nvidia-container-toolkit
配置 Docker 使用 NVIDIA runtime
sudo nvidia-ctk runtime configure --runtime=docker

sudo systemctl restart docker
测试容器内是否能看到 GPU
docker run --rm --gpus all nvidia/cuda:12.8.1-base-ubuntu24.04 nvidia-smi如果能在容器里看到显卡信息,就说明 Docker 的 CUDA 支持配置完成。
需要注意:WSL2 中不要安装 Linux 版 NVIDIA 显卡驱动,驱动由 Windows 侧提供;WSL 和 Docker 容器里只需要 CUDA Toolkit / CUDA runtime / NVIDIA Container Toolkit 等运行环境。